Java Class support

The upcoming 0.9.0 version of the Profiler adds support for Java class files. This will be especially useful for malware analysis. The support includes: disassembler, format views and layout ranges. Let’s see some screeshots of the format itself first.

Here’s a view of the constants:

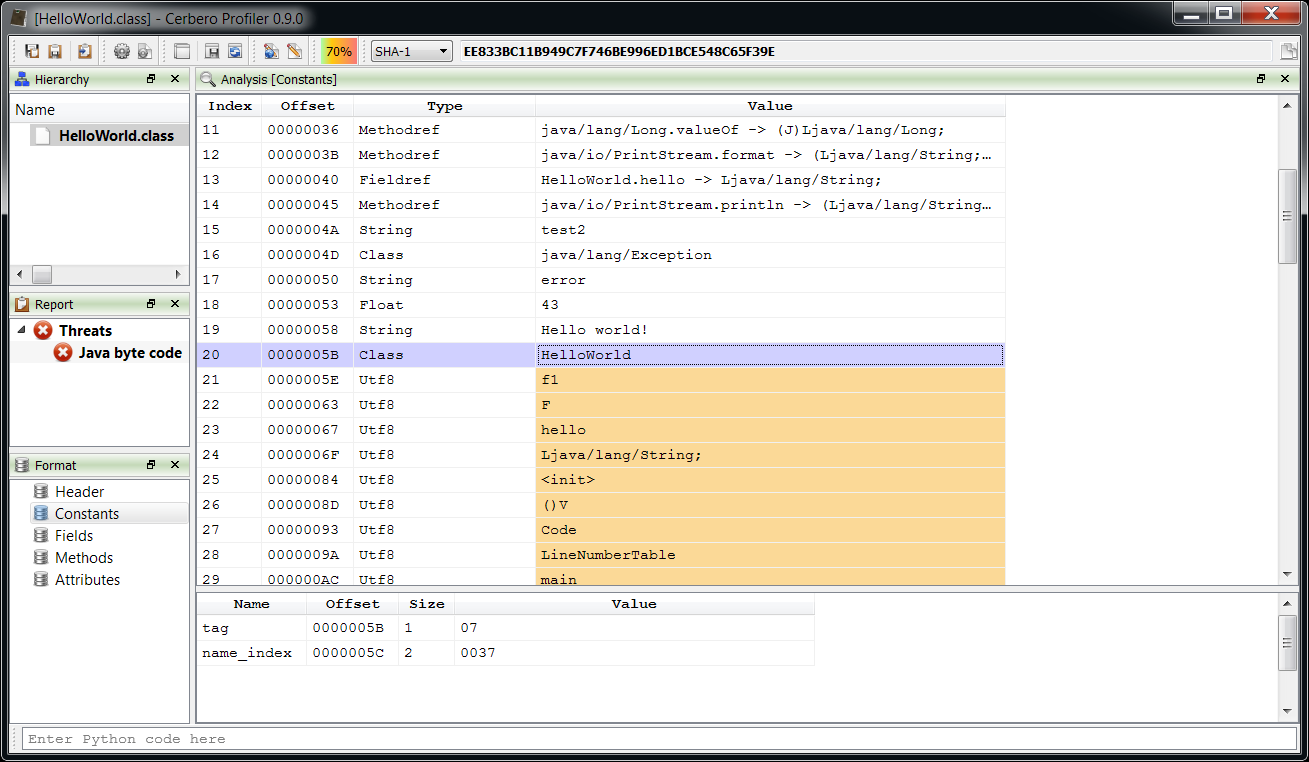
Note: Utf8 strings are highlighted in orange just to distinguish them.

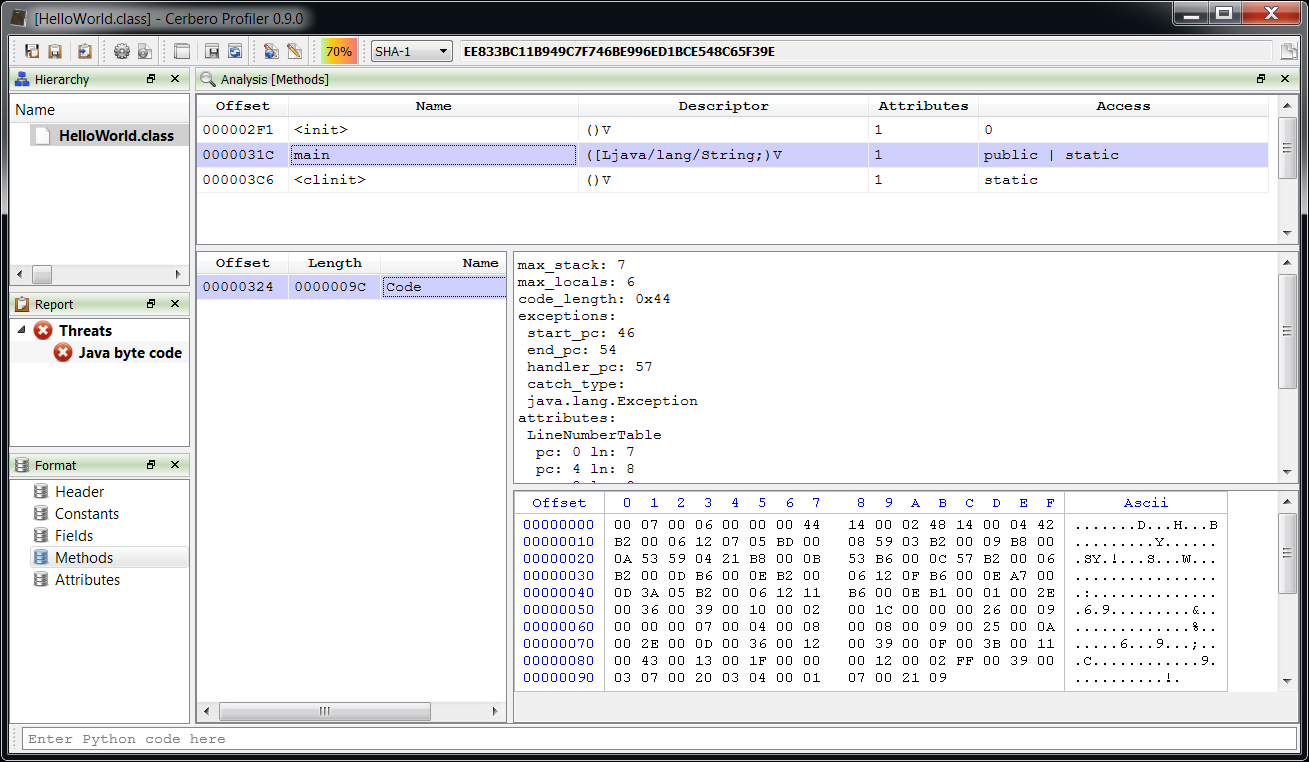
Here’s a view of the methods with their attributes:

And here’s the layout ranges view:

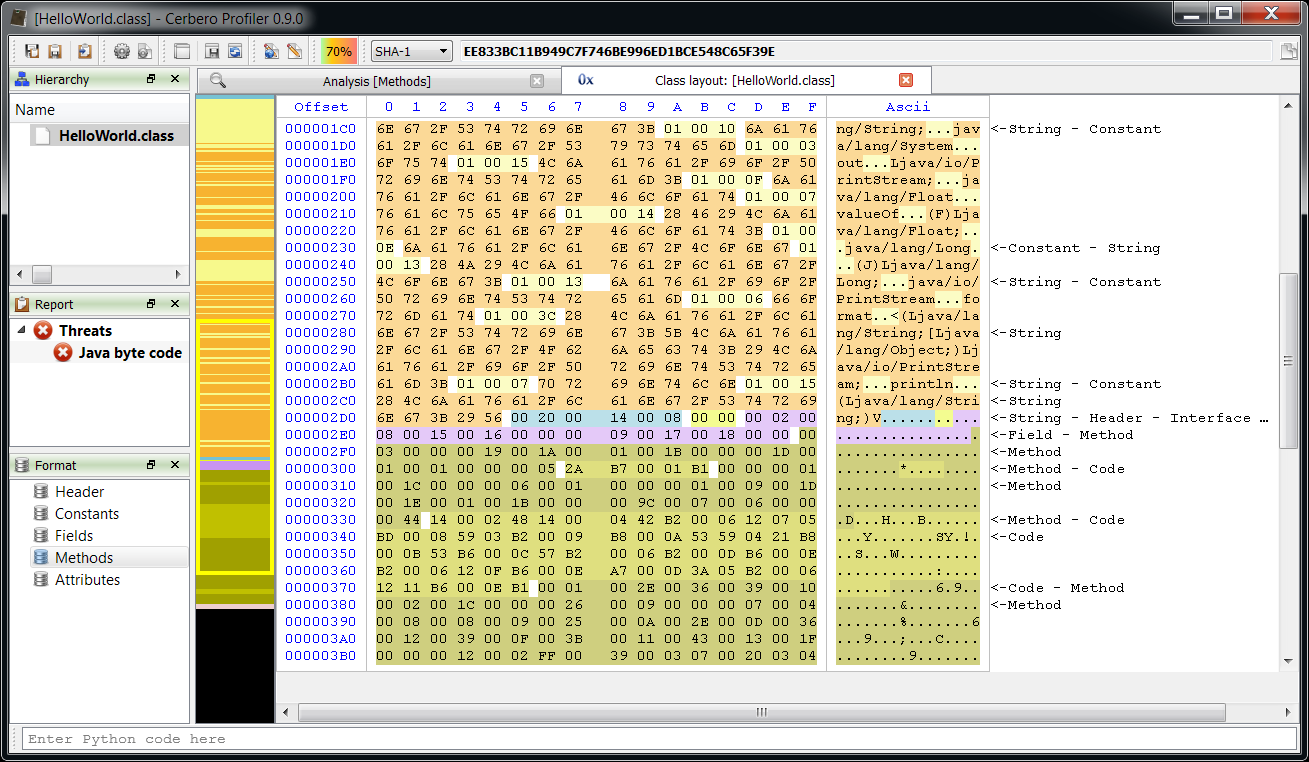
Again strings are in orange, while the actual code of a method is in a slightly lighter green than the method itself.

Since the format of class files is contiguous, it’s extremely easy to use layout ranges to create a new custom class file using the hex editor.

And finally, the disassembler:

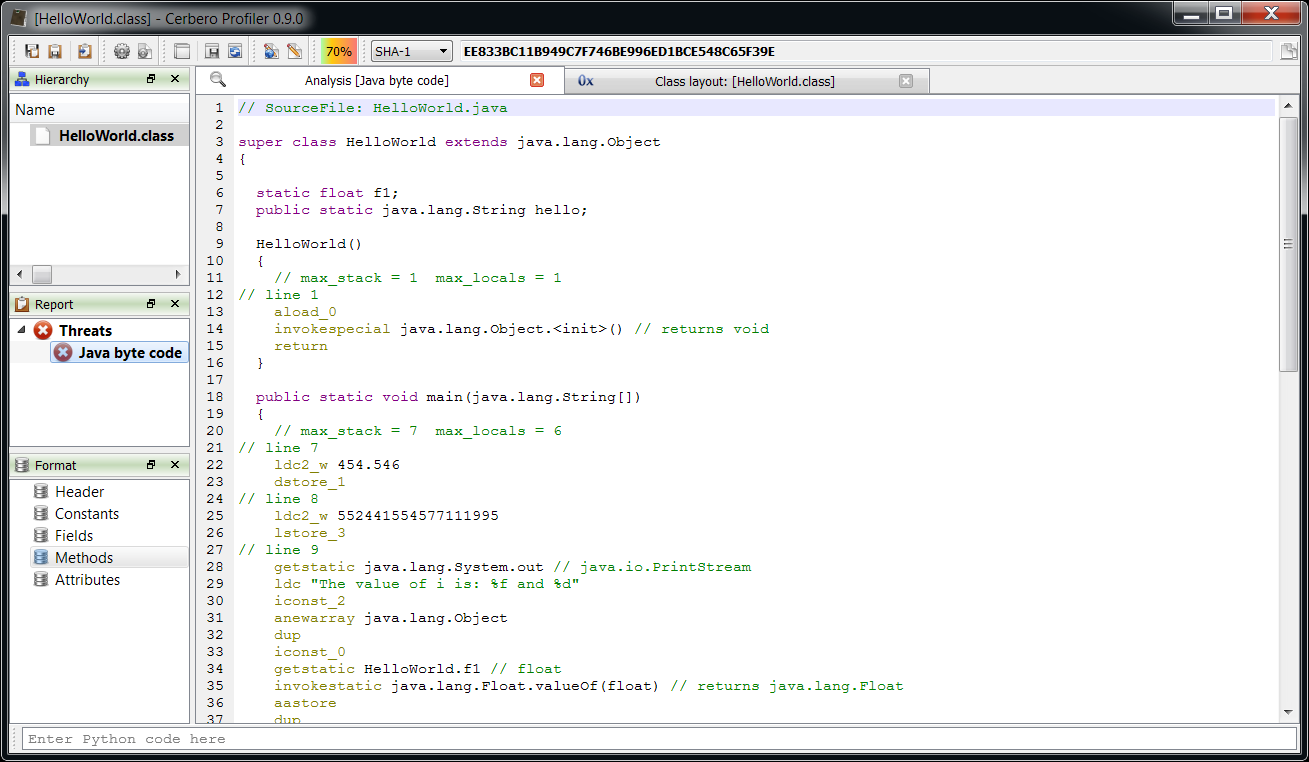
The output shown in the screenshot above:

// SourceFile: HelloWorld.java

super class HelloWorld extends java.lang.Object
{

  static float f1;
  public static java.lang.String hello;

  HelloWorld()
  {
    // max_stack = 1  max_locals = 1
// line 1
    aload_0
    invokespecial java.lang.Object.() // returns void
    return
  }

  public static void main(java.lang.String[])
  {
    // max_stack = 7  max_locals = 6
// line 7
    ldc2_w 454.546
    dstore_1
// line 8
    ldc2_w 552441554577111995
    lstore_3
// line 9
    getstatic java.lang.System.out // java.io.PrintStream
    ldc "The value of i is: %f and %d"
    iconst_2
    anewarray java.lang.Object
    dup
    iconst_0
    getstatic HelloWorld.f1 // float
    invokestatic java.lang.Float.valueOf(float) // returns java.lang.Float
    aastore
    dup
    iconst_1
    lload_3
    invokestatic java.lang.Long.valueOf(long) // returns java.lang.Long
    aastore
    invokevirtual java.io.PrintStream.format(java.lang.Stringjava.lang.Object[]) // returns java.io.PrintStream
    pop
// line 10
    getstatic java.lang.System.out // java.io.PrintStream
    getstatic HelloWorld.hello // java.lang.String
    invokevirtual java.io.PrintStream.println(java.lang.String) // returns void
// line 13
    try
    {
      getstatic java.lang.System.out // java.io.PrintStream
      ldc "test2"
      invokevirtual java.io.PrintStream.println(java.lang.String) // returns void
    }
    catch (java.lang.Exception)  goto loc_57
// line 18
    goto loc_67
// line 15
loc_57:
    astore 5
// line 17
    getstatic java.lang.System.out // java.io.PrintStream
    ldc "error"
    invokevirtual java.io.PrintStream.println(java.lang.String) // returns void
// line 19
loc_67:
    return
  }

  static void ()
  {
    // max_stack = 1  max_locals = 0
// line 3
    ldc 43
    putstatic HelloWorld.f1 // float
// line 4
    ldc "Hello world!"
    putstatic HelloWorld.hello // java.lang.String
    return
  }

}

And the original source file:

class HelloWorld
{
  static float f1 = 43;
  public static String hello = "Hello world!";
  public static void main(String[] args)
  {
    double d1 = 454.545774;
    long l1 = 552441554577111995L;
    System.out.format("The value of i is: %f and %d", f1, l1);
    System.out.println(hello);
    try
    {
      System.out.println("test2");
    }
    catch (Exception e)
    {
      System.out.println("error");
    }
  }
}

There’s yet more to come. Stay tuned. 🙂

News for version 0.8.9

The new version is out. 🙂 Here’s a recap of the latest improvements:

increased python integration and exposed more parts of the SDK
– added SDK documentation to the docs directory
– added Python command line
– added global and individual file notes
improved filters and added range parameters
– introduced fullscreen modality in workspace (F11)

This has been mostly a transition release and what took most of the time were structural changes in how the SDK is exposed to Python so that future releases will benefit from it. The main advantage for the user may be the addition of range parameters in the filters and the introduction of file notes, which is a small feature, but very useful in the context of analysis.

The next release will bring some new file formats and interesting improvements.

Damaged Zip archive (video)

In this video we can see how to inspect a damaged Zip archive using the Profiler in a real-world scenario. Although soon the automatic recovery of damaged Zip archives will be available and it will be possible to perform this sort of task programmatically, it’s still useful to see how to do this kind of thing manually.

Filters with range parameters

The upcoming 0.8.9 release improves filters and introduces range parameters. If you don’t know what filters are you can take a look at the original introductory post.

What is now possible to do is to specify an optional range for the filter to be applied to. This is extremely useful, since many times we need to modify only a portion of the input data. Take, for instance, a file in which a portion of data is encrypted (or compressed) and we want to keep the outer parts not affected by the filter. This would be the layout of the input data:

Data layout

To handle the outer parts (before and after) we have an extra parameter called ‘trim’. This parameter can be set to one of the following values:

  • no: the outer parts are not trimmed and kept in the output data
  • left: the left part is trimmed while the right one is kept
  • right: the right part is trimmed while the left one is kept
  • both: both outer parts are trimmed and the output data will contain only the output of the filter

Let’s try to understand this better with a practical example. Let’s consider a compressed SWF file. The Profiler handles the decompression automatically, but just for the sake of this post we’ll decompress it manually. In case you don’t know, the format of a compressed SWF is as following:

3 bytes: CWS signature (would be FSW uncompressed files)
4 bytes: uncompressed file size
1 byte: version

To dig deeper into the file format you may want to take a look at a new web page we are preparing at fileanalysis.net. But for the sake of our example you need only to know the initial fields of the header. To decompress a SWF we need to decompress the data following the header and then to fix the first signature byte and we’ll do this manually and graphically with filters.

Let’s start by selecting the compressed input data and then by trying to add the unpack/zlib filter.

ZLib filter

As you can see we are prompted with a dialog asking us if we want to use the range defined by the selection of the hex editor on the left (input data). We accept and specify that we want to keep the data on the left (although in this case we could have just disabled the trimming completely, let’s just pretend there’s some data on the right we want to discard).

Now we need to fix the signature byte. To do this we use the misc/basic filter (set operation, offset 0, size 1 and no trimming).

By running the preview we’ll have the decompressed SWF.

The exported filters will look like this:


While this was a very simple case, much more complicated cases can be handled. Also remember that filters can be used to specify how to load embedded files, which means that, for instance, it’s easy to decrypt a file contained into another file and inspect it without ever having to save the decrypted data to disk.

I hope this post offers some understanding of an advanced use of filters.

Python SDK improvements

The upcoming 0.8.9 release of the Profiler improves integration with Python and the SDK exposes new functionality. Moreover, it lays down the groundwork needed to expand the SDK in the next releases. Documentation of the SDK has been included in the docs directory and also a Python command line has been added to the workspace.

To offer a glimpse of the capabilities here is a small code snippet to create a custom plot which could be used, for instance, to display entropy.

import random

ctx = proContext()
v = ctx.createView(ProView.Type_Plot, "Test") 
v.setPlotTitle("Random")
v.setAxisScale(ProPlotView.xBottom, 0, 100)
v.setAxisScale(ProPlotView.yLeft, 0, 50)
x = NTDoubleVector()
y = NTDoubleVector()
i = 0
while i < 100:
    x.append(i)
    y.append(random.randrange(50))
    i = i + 1
v.addCurve(x, y)
ctx.addView(v)

And the screenshot of the created plot.

Custom plot

While this doesn't sound too exciting at first, the on-going SDK expansion will allow to do some very interesting things. Stay tuned as some more technical posts are coming.